
How can signed and trusted processes bypass the behavioral detection of EDRs? An analysis of Guest Operations abuse via the vmtoolsd component of VMware Tools using Palo Alto Cortex XDR, test outputs, and a custom rule configuration that both detects and prevents this scenario.
EDR solutions, thanks to their behavior-driven architectures, have recently moved ahead of antivirus solutions in endpoint security. A modern EDR does not merely catch known malware through signature-based methods; it collects and analyzes as a whole the processes that are created, the behaviors that occur on the system, file system activity, and user behavior, and takes action against threats through these multi-layered detection capabilities.
However, signature-based and reputation-based methods can be bypassed through the abuse of trusted processes. Threat actors frequently target digitally signed and well-known processes in particular. Although this scenario is most often seen in the abuse of Windows system files, it also appears in software commonly used in enterprise environments, such as VMware Tools. In this article, the abuse scenario of the vmtoolsd process, together with the traces this scenario leaves on Palo Alto Cortex XDR, how it can be detected and how it can be prevented, is examined through a case study performed in InfinitumIT test environments.
VMware Tools Case Study
"vmtoolsd" is a signed, legitimate and trusted process that runs within the scope of Guest Operations and is the core component of VMware Tools. Operations initiated on the Guest OS side, instead of coming through remote access over the network, pass through vmtoolsd, which sits between the hypervisor and VMware Tools. These operations do not use protocols such as PsExec, RDP, WinRM, or SMB. Since these protocols are not used and the activity is limited only to endpoint telemetry, operations launched via vmtoolsd can become a blind spot for EDRs.
Why Do EDR Platforms Miss This Activity?
EDR may automatically consider signed and trusted processes as low-risk.
EDR may fail to correlate activity inside the VM with its effects on other endpoint devices.
Because protocols such as SMB, WinRM, RDP, or PsExec are not used in these VM-internal activities, EDR may not be able to match them against traditional attack topologies.
What Should the Detection Approach of Modern EDR Platforms Be?
EDR should not regard signed processes as low-risk from the outset; it must perform behavioral analysis.
Relationships between parent-child processes should be analyzed in more detail, and unusual activity should be approached with suspicion.
Not only the running processes but also the commands executed under each process should be examined in detail.
Detecting Trusted Process Abuse from the Cortex XDR Perspective
When evaluating a process event, Cortex XDR determines not only the direct parent reported by the operating system but also the origin of the chain. Cortex calls this root process the Causality Group Owner (CGO) — that is, the actual process that owns the causality chain of an activity. In a cmd or PowerShell activity launched via vmtoolsd, the CGO of this chain becomes vmtoolsd.exe.
This is precisely the root of the problem. Because vmtoolsd.exe is a binary signed by VMware and considered legitimate and trusted, many EDRs, including Cortex XDR, may not view child processes running under this trusted parent — for example cmd.exe, powershell.exe, or other LOLBin processes — as suspicious under default behavioral analysis, and thus may not generate an alert. In short, a trusted and signed parent can render invisible the potentially malicious child process chain born beneath it by overshadowing it. Yet in the normal operation of VMware Tools, it is not typical behavior for a script interpreter such as powershell or cmd to spawn under vmtoolsd.
At this point our detection logic is built on inverting the trust of the EDR. It is designed to detect every activity whose CGO is vmtoolsd.exe and that spawns as a script interpreter or LOLBin (PowerShell, CMD, WScript, CScript, MSHTA) beneath it. In order to surface these activities, the following XQL query was run in the Cortex XDR Query Builder:
The purpose of this query is to filter processes whose CGO is vmtoolsd.exe and that contain PowerShell, CMD, or Windows Script Host components in either the command line or the process name. Within the scope of a controlled test, an unexpected process (cmd/powershell) was created on the Guest OS under the vmtoolsd.exe parent, and an unusual command was executed. The output of the query is shown below.

Figure 1. Cortex XDR Query Builder: the XQL query surfacing activity whose CGO is vmtoolsd.exe with a script interpreter spawning beneath it, and its single-result output. Although the telemetry is present, no alert was generated under the default configuration.
As seen in the output, a parent process considered signed and trusted (vmtoolsd.exe) started a cmd.exe child process beneath it and executed an obfuscated PowerShell command on the command line:
The -EncodedCommand parameter denotes a PowerShell command encoded with Base64 and is a classic indicator of obfuscation and defense evasion. The critical finding here is this: even though a signed and trusted parent, unusual child processes, and the commands executed within those child processes were fully logged by Cortex XDR, these activities were not treated as an anomaly under the default configuration and did not trigger an alert. That is, the telemetry is present, but because the parent process is trusted and legitimate, behavioral detection does not kick in.
Prevention Steps | Creating a BIOC Rule from an XQL Query
An XQL query written in Cortex XDR can be directly converted into a BIOC (Behavioral Indicator of Compromise) rule. If the query has a valid BIOC structure in the Query Builder, the "Valid BIOC" indicator appears in the interface. By selecting BIOC Rule from the Save as menu, the query is turned into a persistent behavioral detection rule.
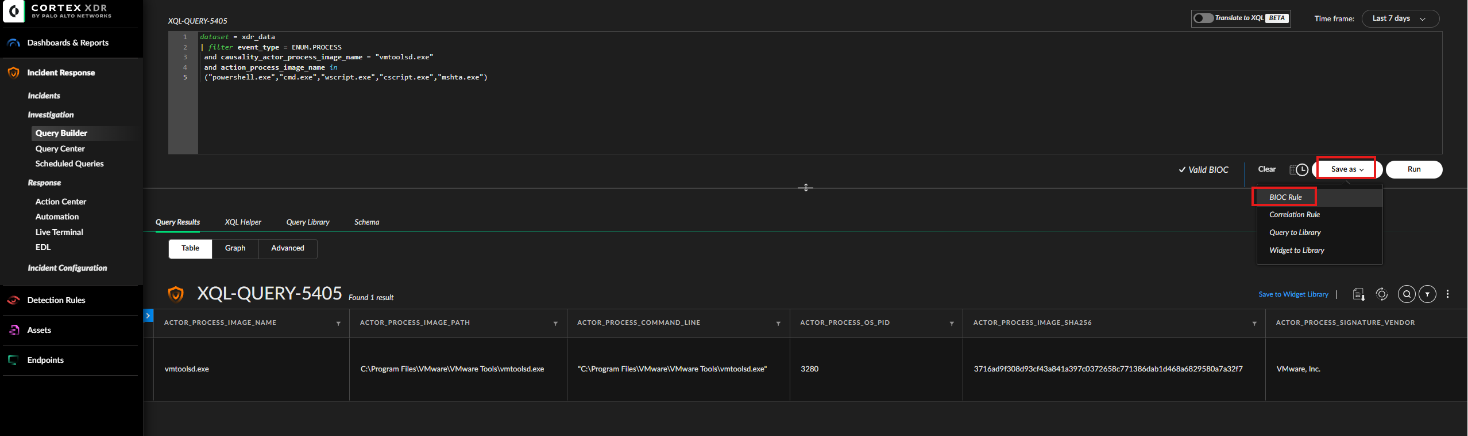
Figure 2. Creating a BIOC from an XQL query: the 'Valid BIOC' validation and Save as -> BIOC Rule.
The query output at this step also validates the basis of the detection: the parent process path is C:\Program Files\VMware\VMware Tools\vmtoolsd.exe, and the signing vendor appears as VMware, Inc. That is, the parent is indeed running from the expected directory and with the genuine vendor signature. The trust that a threat actor can leverage rests precisely on this fact. Even so, the spawning of a script interpreter under this parent process is an anomaly, and this is the behavior our rule catches.
When saving the rule, a name, type, MITRE ATT&CK technique, and severity are assigned. In this test the rule was created with the name "VMTools GuestOps - Script Interpreter Spawn", of type Execution, and with High severity.
The created rule is listed under Detection Rules / BIOC, and from now on, whenever a script interpreter process spawns beneath vmtoolsd.exe, an alert will be triggered thanks to our BIOC rule.
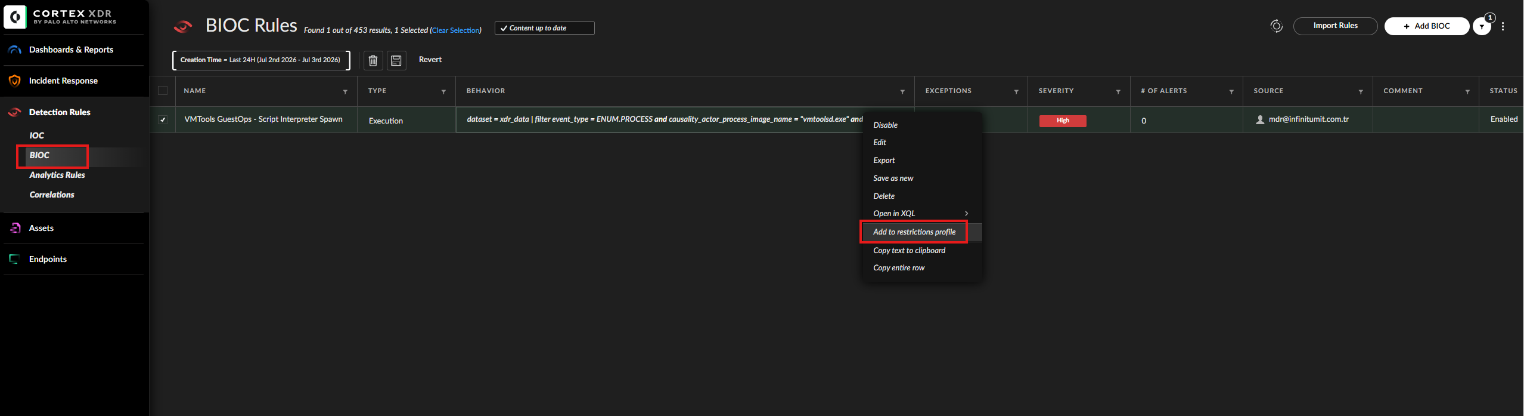
Figure 3. Detection Rules -> BIOC: the created "VMTools GuestOps - Script Interpreter Spawn" rule (Execution, High, Enabled) and the 'Add to restrictions profile' option in the right-click menu.
This rule was created to generate alerts by detecting activity launched with vmtoolsd.exe as the parent process and whose child processes include interpreters such as PowerShell, CMD, or similar. In this way, when vmtoolsd is used outside of normal user behavior — especially in covert command execution scenarios — Cortex XDR will provide early-stage visibility. The "Add to restrictions profile" option seen in the right-click menu in the screenshot above is used to convert this rule from being purely detection-focused into a preventive one.
Prevention Steps | Restriction (Custom Prevention Rule) Profile
By default, a BIOC rule in Cortex XDR only generates alerts. In order for the same rule to block the relevant behavior in real time, the rule must be added to the Custom Prevention Rules section within a Restrictions (Prevention) profile. When this profile is assigned to a prevention policy, the behavior defined by the rule is blocked on the endpoints within scope. The steps of this configuration are shown below.
Step 1 — Create a Prevention Profile
Follow the path Endpoints / Policy Management / Prevention / Profiles and click the Add Profile button to create a new profile.
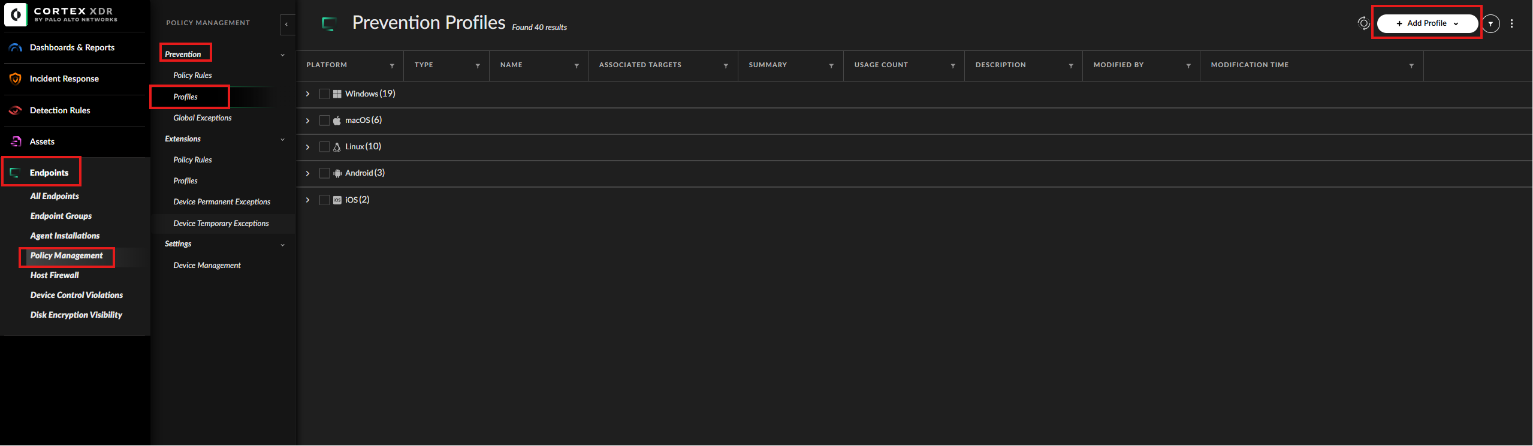
Figure 4. The Endpoints -> Policy Management -> Prevention -> Profiles screen and creating a new prevention profile via 'Add Profile'.
Step 2 — Select the Platform and Profile Type
On the screen that opens, Windows is selected as the platform and Restrictions as the profile type. The other profile types are Malware, Exploit, Agent Settings, and Exceptions; however, custom BIOC-based prevention rules are only available in the Restrictions profile.
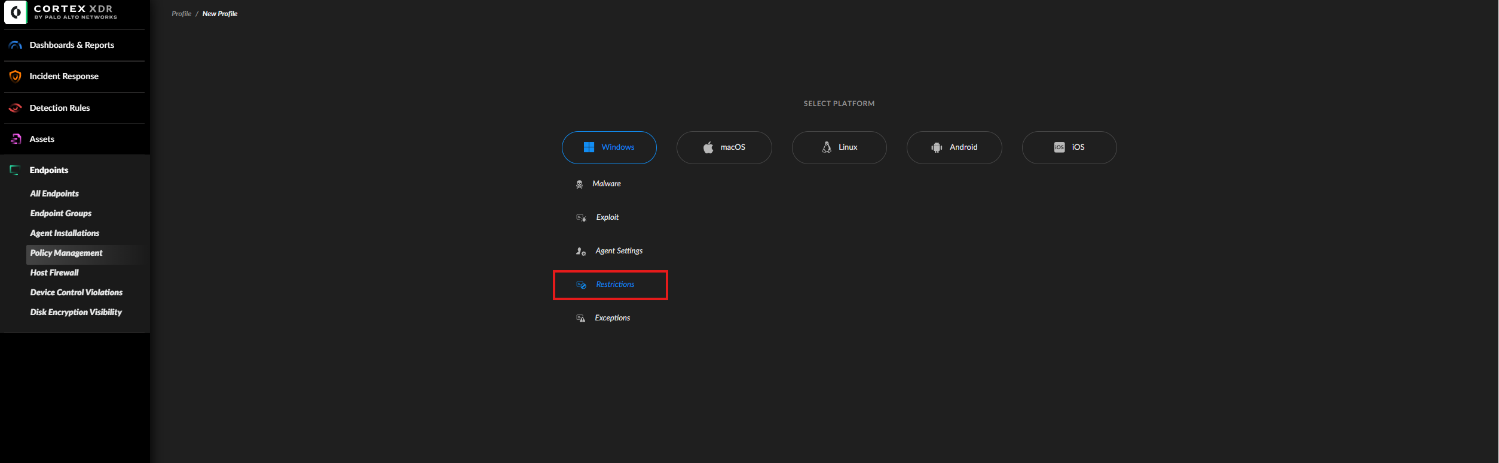
Figure 5. In the new profile, selecting Windows as the platform and Restrictions as the profile type.
Step 3 — Custom Prevention Rules Section
Switch to the Custom Prevention Rules tab in the left-hand menu of the Restrictions profile. As also stated in its description, this section is reserved for user-defined BIOC prevention rules. The Action Mode value is set to Enabled. In addition, the "Auto-disable rules that trigger more than 100 times in 30 minutes" option can be kept enabled as a safety measure that prevents a faulty rule from affecting all endpoints.
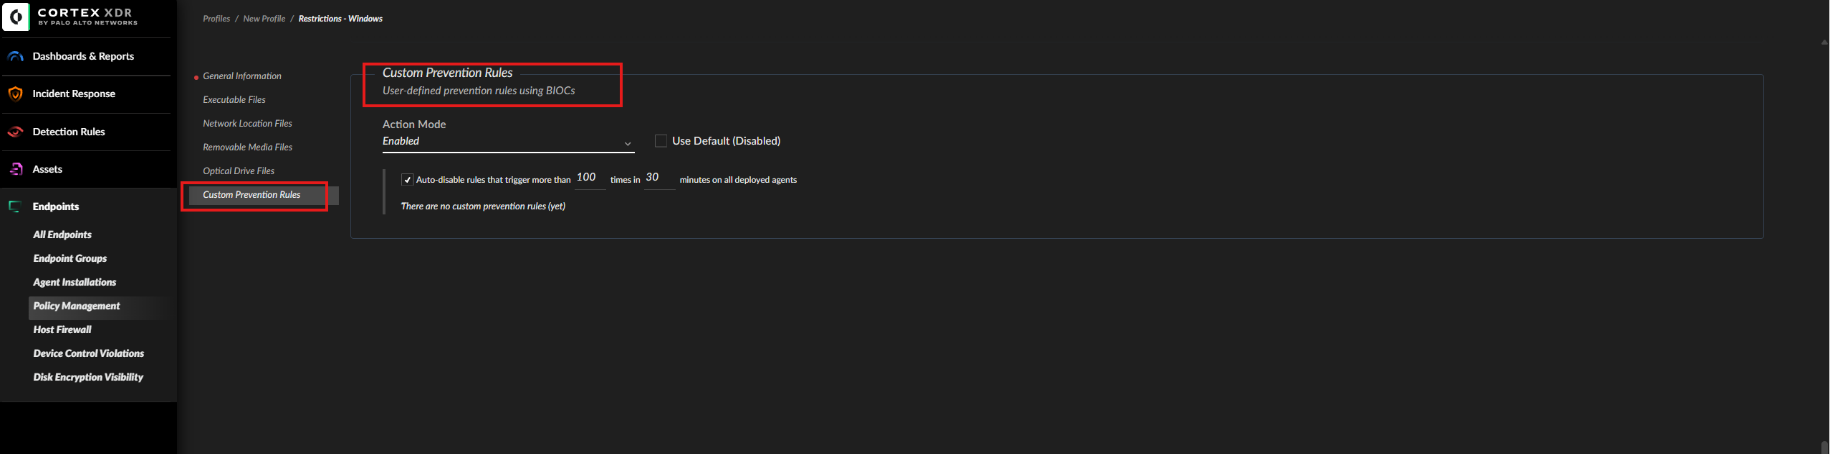
Figure 6. The 'Custom Prevention Rules' section within the Restrictions profile: BIOC-based, user-defined prevention rules; Action Mode set to Enabled and the auto-disable safety valve.
Step 4 — Add the BIOC Rule to the Profile
Finally, the BIOC rule we created is brought into the prevention scope. Under Detection Rules / BIOC, the relevant rule is selected, and from the right-click menu the Add to restrictions profile option is clicked. In the dialog that opens, the platform profiles the rule is compatible with are listed; in this test the rule was added to the TB TEST profile among the Windows profiles. Once this Restrictions profile is assigned to a prevention policy, the rule now provides not only visibility but also real-time prevention.
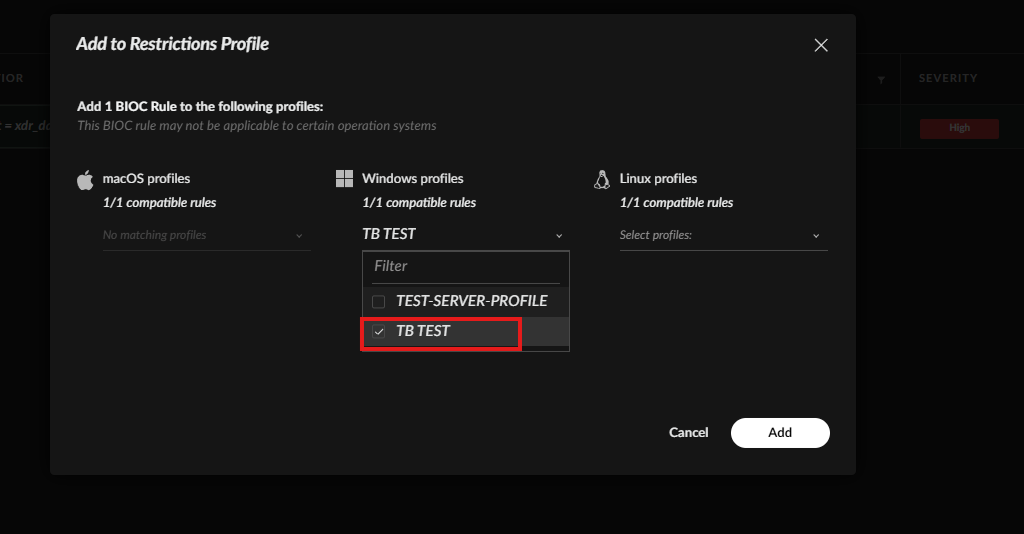
Figure 7. The 'Add to Restrictions Profile' dialog: adding the BIOC rule to the 'TB TEST' profile among the Windows profiles.
Recommendations for the VMware Tools Case
Management access to vCenter and ESXi should be protected with multi-factor authentication (MFA), delivered as much as possible via out-of-band management, and administrator accounts should be monitored through PAM solutions with session recordings kept.
The Guest Operations privilege should be granted only to the user and service accounts that truly require it, its usage should be regularly audited, and alerting mechanisms should be set up for unusual usage.
Application control mechanisms such as PowerShell Constrained Language Mode, AppLocker, or WDAC should be enabled on the Guest OS to restrict the uncontrolled execution of PowerShell and similar interpreters, and the visibility of PowerShell activity should be increased.
On the Cortex XDR side, existing exceptions for processes launched under vmtoolsd.exe should be reviewed; the CGO-based BIOC rule addressed in this test should be put into operation and tied to prevention via a Restrictions profile.
Behavioral detection rules targeting the parent-child relationship in this case in particular should be defined, and controls should be sustained with regular threat hunting activities.
This article is based on the results of controlled tests carried out in an actual Cortex XDR environment. The XQL queries presented along with the BIOC and Restriction configurations are provided as examples.
Disclaimer: This document is for informational and defensive purposes only. The queries and configurations presented are examples; they may differ depending on product version, sensor policy, and environment configuration, and should be validated in a controlled environment before deployment. The content contains no attack procedure or exploit code.
Hakan AKSUNGUR — L2 MDR Analyst
InfinitumIT MDR — Detection Engineering & Threat Hunting


